Author: James Impallaria of Sonata
MeasureSquare is currently marketed as a takeoff software for the flooring trade. Flooring takeoffs are our bread and butter. After using M2 for a while, however, the user starts to understand that this program can be used to measure anything. Whether you have a 100-page set of architectural plans, or a few dimensions/measurements written down in a notebook, M2 puts a suite of measurement capabilities at your fingertips.
Plumbing, HVAC, Electrical, insulation, drywall, and painting are just a few common examples of takeoffs that are feasibly completed within M2. In the article below, you will find guidance on how to begin doing takeoffs in trades other than flooring. These off-trade takeoffs really come down to being able to create your materials out of the item types available in M2. Learning the in’s and out’s of these item types is the key.
When we create a product in M2, the first thing we do is choose what type of item it is. M2 has all measurement types pre-programmed into their system.
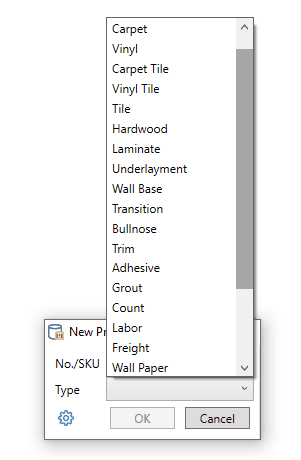
At first glance, this list seems to cater only to flooring. The “Vinyl” item type can only be used for sheet vinyl, right? Wrong. Each of these item types holds different properties that enable us to measure the given product correctly. Learning the differences between these types gives us a foundation for understanding how to complete takeoffs in other trades.
M2 has some videos that help with this. I recommend making an account on udemy.com and checking out the “MeasureSquare 8: Measure Estimating for Commercial Flooring” course. Section 4 of the course gives a simple introduction to these item types.
The main types of items in M2 are:
#1. Sheet Goods (Carpet, Vinyl, Wall Paper)
These sheet item types are incredibly useful to us when looking at other trades, because we can use them to create other sheet-based items. Drywall is a prime example. Making a sheet item that’s 8′ Wide by 4′ Long gives us a takeoff for sheetrock.
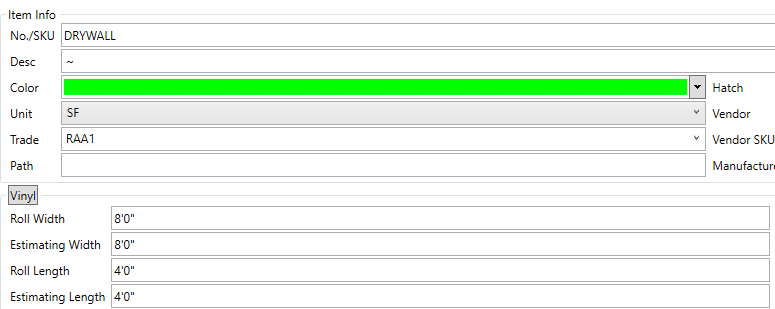
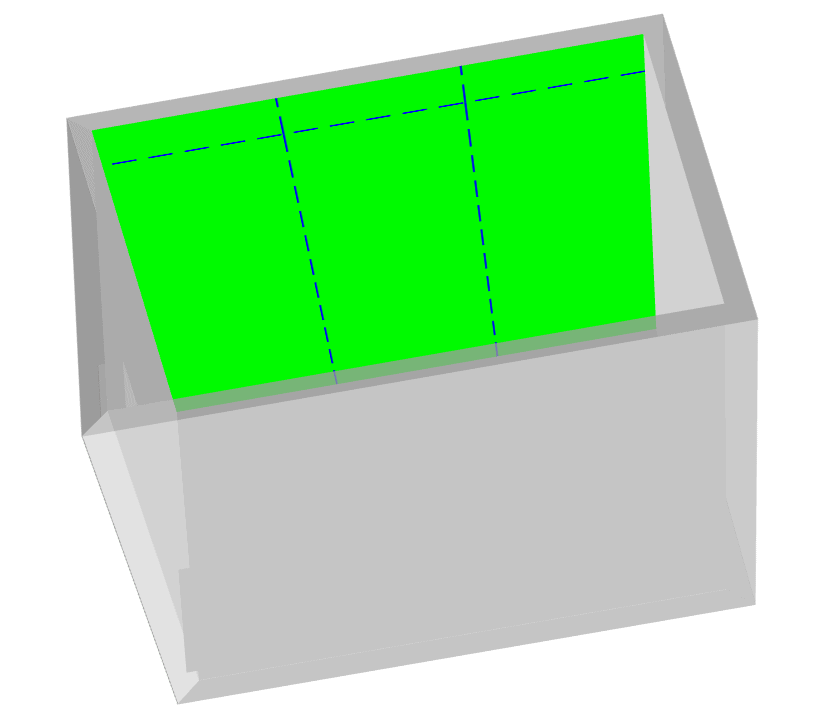
Not only does this enable us to measure the amount of drywall needed, it visually applies the drywall sheets to our shop drawings and 3d models:
Any sheet item can be created this way. The only limitation I have found is that 2′ x 4′ seems to be the smallest size.
The sheet good system and tile system each have their own method of measuring their seams. For sheet goods, a linear addon can easily be applied to the seam length in order to account for these seams. In the case of drywall: if desired we could estimate the amount of tape and compound needed based on our seam measurement.
You could use this same concept to do takeoffs for rolled insulation, sheet-based wall coverings, cement board, and much more.
#2. Tile (Tile, Carpet Tile, Vinyl Tile)
Tile products are a bit more straight-forward. The only real application for a Tile product is one that is sold in uniform pieces. The one feature of tiling that does stand out is the ability to use different shapes. Ceiling tile would be an obvious application here: triangular or hexagonal ceiling tiles can be created with ease. You even have the option to “Freedraw” your tile to whatever shape you need.

Another reason that tiles are useful is that you can create your own patterns from scratch. This could be useful in measuring custom wall and ceiling designs, stone fireplaces or chimneys, etc.
One thing to be careful with when using tile products is the grout width. If you are using a tiled product that doesn’t need grout, make sure to set your grout width to 0, or your quantities will be off.
Similar to sheet goods, tile can be used to measure the seams between each tile. Simply create a linear addon, then apply that item to the tile as if it were a grout product. This will give you the linear measurement of the grout lines, AKA the seam length.
#3. Planks (Hardwood, Laminate)
Planks are very similar to tile with a couple of key differences. First: planks do not use grout. Second: planks are always rectangular. Lastly, and this is a semi-important one: planks have the ability to form a ‘random’ pattern. Unlike tiled products, one of the pattern options available for planks is truly “Random.” You can come close with tile, but it takes a lot of work and you will almost always see some repetition. For whatever reason, planks are the way to go if you are looking for a random design. Useful applications here would be slotted walls, or custom wood finishes.
#4. Membranes (Adhesive, Underlayment)
Membranes have many uses, but for the most part you will only want to use these when you are dealing with a liquid. You can apply a waste percentage, as well as a spread rate, but nothing else. For this reason, membranes are impractical to use for rolled/sheet goods in most cases. They could be used when estimating waterproofing layers or different types of cement.
#5. Grout
Grout is an item type that you should probably steer clear of unless you are actually using a specific ‘grout’ type product, or if you are trying to measure the seams of a tile product as mentioned above. The way M2 calculates grout is absurdly accurate, but its also a bit tricky.
Some users set the grout width to 0″ and ignore this feature for simplicity’s sake.
#6. Labor
Labor is an important one. Obviously we could use this to measure the install costs of any of our products. Because of this, Labor is the only item type that can measure area Linear, and Count products.
There are times when you can choose to build in an item in a number of different ways. For example: say you usually charge rough-in plumbing labor by the linear feet of pipe to be installed. On some jobs, it could be more practical to charge by the number of plumbing fixtures installed. These two methods would need to be built-in to M2 in completely different ways.
This is just one example, but considering the way you are charging your labor will determine the way you build your products.
#7. Linear
Linear items are possibly the most useful when doing takeoffs in other trades. Linear items can be used to measure pipes, conduit, wire, molding, trim, and tons more. It’s a simple as drawing a line.
When using linear takeoffs to measure lines on a single floor, you don’t even need to trace out the room. Simply draw a segment right on your plan, and attach your linear item to it. You can complete a full floor in a matter of minutes using this method.
The only setback here lies with linear items which travel vertically, such as pipes running from floor to ceiling within a wall. To include these lines in your takeoff, you will need to utilize the walls, which would require drawing out the room as if you were measuring the floors.
#8. Count
Lastly, we have count items. These will be necessary for virtually every trade. Examples of count items range from small things such as pipe fittings, power outlets, and thermostats, to large accessories such as toilets, AC units, or light fixtures. MeasureSquare has recently implemented the “Stamp” feature, which allows the user to display a specific marking on their takeoff.
The standard count takeoff is effective, but when you have multiple count items it tends to become a bit confusing (you can end up with a sea if multicolored dots). The “Stamp” enables us to display unique pictures anywhere on the takeoff. If used wisely, this can make a complicated count takeoff much easier to read and, for those of us submitting these takeoffs as bids, improve the presentation of your entire bid package.
#9. Custom
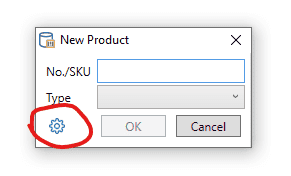
It’s worth noting that we can create our own item types within M2. By clicking the gear symbol on the ‘New Product’ screen, you can manage your list of item types.
When creating a new item type, you will be prompted to select a “Base Type” from which the new item will adapt it’s characteristics.
Essentially, the new item type will differ from it’s base type in name only. However, creating a “Drywall” item type with a base type of “Vinyl” may simplify things for your fellow estimators who are not as familiar with MeasureSquare.
Once you master these item types, almost any measurements become possible within M2. Of course there are other pieces to this puzzle, but once you can create an item to accurately match the materials you need for a job, the rest comes naturally. Hopefully this article gave you some idea on how to create most of the items needed for your given trade.